Data Entry Instructions: Self-Management Resource Center Tool Kits for Active Living with Chronic Conditions, Diabetes, and Pain
4 min read

The Self-Management Resource Center (SMRC) issues licenses for five types of tool kits:
- Tool Kit for Active Living with Chronic Conditions
- Tool Kit for Active Living with Diabetes
- Tool Kit for Active Living with Chronic Pain
- Herramientas para tener una vida activa con condiciones crónicas
- Herramientas para tener una vida activa con diabetes
There are three ways to implement the tool kit:
OPTION 1: Mail or distribute the Tool Kit and required surveys (no further interaction).(This is an acceptable approach for Cohorts 2020, 2021 or earlier. NOT for Cohort 2022 or after).
OPTION 2: Mail or distribute the Tool Kit with some, minimal engagement (for example, a phone call check-in, email or other touchpoint to connect with the participant informally). (This is an acceptable approach for any Cohort, 2020 or after).
OPTION 3: Mail or distribute the Tool Kit and engage participants in 6-weekly scripted phone calls with a trained leader to discuss the material. For more information, visit the Self-Management Resource Center website or contact them directly. To access the phone scripts, the leader must request a copy from their licensed organization. (This is an acceptable approach for any Cohort, 2020 or after).
Recommended process for distribution of tool kits & data collection forms
Administration for Community Living (ACL) grantees implementing the Tool Kit in any format must collect participant data using the required ACL data collection forms. Here's guidance on how to collect and enter Tool Kit data into the Healthy Aging Programs Integrated Database (HAPID®).
Issue the Pre-Test Survey + Tool Kit:
- Issue the Participant Information Survey (pre-test) on paper (mailed or delivered in another way) or online to individuals along with the Tool Kit. Ask the participant to mail it back or drop it off at a particular location.
- Alternatively, ask participants to complete the online version of the Participant Information Survey (pre-test) first, and then issue the Tool Kit (mailed or delivered) once the survey has been completed.
- Optional—Host six weekly scripted phone sessions with a small group of participants using the Tool Kit (more information below).
Program research has demonstrated that individuals who first complete a data collection form are more likely to review the contents of the Tool Kit when compared with those individuals who are mailed the tool kit without any up-front commitment.
Issue the Post-Test Survey:
- Issue the post-test survey on paper (mailed or delivered in another way) or online to the participant after sending the Tool Kit. You can include the post-test questions in a follow-up satisfaction survey by mail or online.
- A reminder by email, phone call, or mailed post-card can encourage the participant to engage in the Tool Kit and complete the post-test survey. This could be done in appropriate intervals, such as after the first 2 weeks, 4 weeks, and 2 months. The intervals are up to you.
- To link responses to the post-test question to the baseline demographic data collected via the Participant Information Survey, be sure that the Participant ID matches for both surveys. The Participant ID can be pre-marked on the satisfaction survey prior to distribution.
Data entry in HAPID®
The data entry process will depend on how the tool kit was implemented. To enter data for Tool Kits that were delivered in the format described in Option 1 or Option 2 above, you’ll need to create an “umbrella workshop” following the steps below.
Creating umbrella workshops
When entering this workshop into HAPID®, you’ll need to first create umbrella ‘workshops’ in the database. All Tool Kit participants will be added to these umbrella ‘workshops.’ This structure is required by the structure of the database. You can do this in two ways, depending on the volume of Tool Kits issued: MONTH or by SEMI-ANNUAL REPORT period.
- Scroll through the programs and select the Tool Kits (e.g. Chronic Disease, Diabetes, or Chronic Pain) as the Workshop Type.
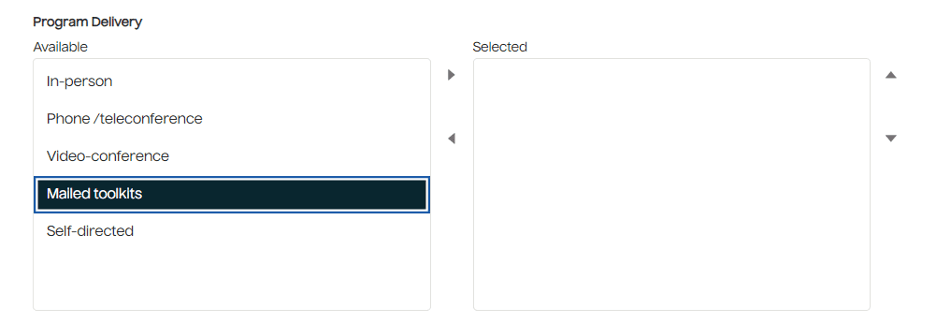
- Next, select the Program Delivery. This is a required question on your Workshop Cover Sheet. This is the place to track the format. How did you deliver most of the tool kits in a given month or semi-annual report period.
- These are the options, and you can select more than one. If you issued the tool kit and touched based with the participant by phone or email, you could select both ‘Mailed tool kit’ and ‘Phone/teleconference.’ It’s also appropriate to select ‘Self-directed,’ as the tool kit is exactly that.

Next, you’ll be required to enter a Workshop Start Date and Workshops End Date. You can set this up by MONTH or by SEMI-ANNUAL REPORT period
By MONTH:
For example, set the Workshop Start Date to the start of any given month (e.g. 6/1/2024) and the Workshops End Date to the end of that period (e.g. 6/30/2024). This is ideal if you are distributing more than 30 Tool Kits per month. You would then add any participants who received the Tool Kit in each respective month. A participant who started in July 2024 would thus be entered in your July 1- 31, 2024 workshop.
By SEMI-ANNUAL REPORT PERIOD:
For example, set the Workshop Start Date to the start of your semi-annual report period (e.g. 5/1/2024) and the Workshops End Date to the end of that period (e.g. 10/31/2024). This is ideal if you are distributing less than 30 toolkits per month. You would then add any participant to this workshop who received the tool kit during this semi-annual report period.
Adding participants to your workshop
1. Create "workshop" for specific date range or semi-annual report period, following the steps above.
2. Once you’ve created your workshops, you’ll select your workshop and click on ‘Create Participant’ in the top right corner of your workshop.
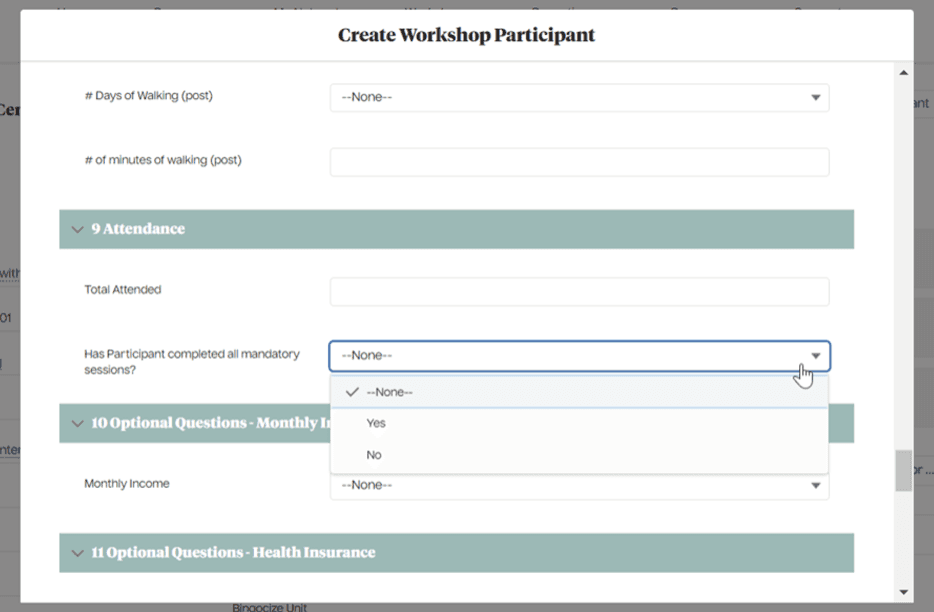
3. In the Participant Survey Template, scroll down to the Attendance section:
- Enter at least a “1” in ‘Total Attended’ for any participant for which you have evidence that they received the Tool Kit. A 1 or more makes this individual at least a “Participant.” You can also enter a ‘1’ if they signed a sheet /receipt confirming they received the toolkit and/or completed a baseline Pre-Survey.
- To designate whether the Participant is a Completer or not, you’ll need to select YES or NO to the question “Has participant completed all the mandatory sessions?”
i. Select YES if you have evidence that the participant actively engaged in some portions of the Tool Kit. (for example, you touched base with them by phone and they indicated they were reviewing the material)
ii. Select YES if you received a Post-Survey from the participant.
iii. Select NO if you have no evidence of their engagement in the material and did not receive a Post-Survey.

Mailed or distributed the Tool Kit AND facilitated 6-weekly phone calls with a trained leader
During the pandemic, the Self-Management Resource Center (SMRC) introduced another approach for using the Tool Kit. This involves coordinating scripted phone or teleconference convenings, weekly for six weeks, led by an instructor. The gatherings can last 30 to 60 minutes and have approximately three to six other participants. This continues to be an option. For this format, participants must attend at least 4 of the six sessions (Completer = 4 of the 6 sessions).
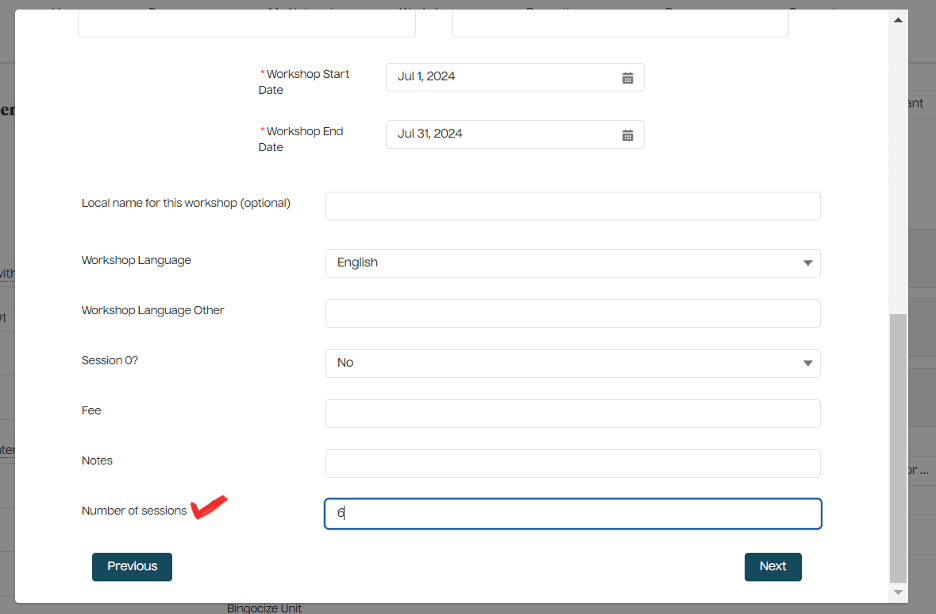
When creating a workshop, after you select the Tool Kit from the program options, add your Workshop Start and End Date. At the bottom of the workshop modal, you can enter the total number of sessions for that given workshop. If there were a total of six phone/teleconference sessions, you can enter 6 in this space, as shown below.

To add participants to your workshop, select the workshop you just created, and then in the top-right corner, select ‘Create a Participant.’
In the Participant Survey Template, scroll down to the Attendance section:
- Enter the total # of sessions attended by that participant. If they attended only three of the six, then enter 3.
- An attendee is considered a ‘participant’ if they attended at least one session.
- An attendee is considered a ‘completer’ if they attended at least the minimum sessions (4 to 6). To designate a completer, then answer YES to the question “Has participant completed all the mandatory sessions?” Otherwise, select ‘No’.


